Most organizations that set out to build a video studio make one of three mistakes before they spend a dollar on equipment.
The first:
They start with products instead of use cases. Someone gets excited about a camera or a lighting rig, and the entire project forms around that purchase rather than around what the studio actually needs to produce. Six months later, the setup can’t handle the one thing leadership wants most.
The second:
They underestimate the room. Acoustics, power delivery, ceiling height, and ambient light all impose hard limits on production quality. A poorly chosen room will sabotage every piece of equipment inside it, and those problems compound over time.
The third:
They buy for today. The studio handles one workflow well but can’t adapt when the organization needs something different. Rework costs more than building flexibility from the start.
This guide walks through every decision in sequence — from defining your use cases to choosing the right room, understanding the subsystems that make up a studio, and selecting an architecture that can grow. If you follow this order, the equipment choices get easier and the mistakes get cheaper.
Start with use cases, not equipment
Before choosing a single camera, light, or microphone, define what your studio needs to produce. The equipment follows the content strategy, not the other way around.
A studio built for recorded executive messages has fundamentally different requirements than one designed for live panel discussions or hybrid meetings. Mapping use cases to requirements early prevents the most expensive mistake in studio planning: buying gear that doesn’t match your actual production needs.
| Use case | Minimum camera setup | Minimum lighting | Audio requirement | Control / distribution | Key consideration |
|---|---|---|---|---|---|
| Executive comms / town halls | Single PTZ or fixed | 3-point LED | Lavalier + room mix | Stream + record | Framing changes require automation or a dedicated operator |
| Training / instructional video | Single or dual PTZ | 3-point LED | Lavalier preferred | Record to LMS integration | Background consistency matters; green screen adds complexity |
| Panel discussions / roundtables | 3-camera minimum | Full soft-light setup | Multiple lavs or boundary mics | Switching required | Needs an operator unless automated |
| Live events / CEO broadcasts | 2–3 cameras | Full setup + hair light | Professional audio chain | Stream + record + backup | Latency, reliability, and fallback paths are non-negotiable |
| Hybrid meetings (staff + remote) | PTZ with auto-framing | 3-point or overhead PoE | Room mic + remote audio | Video conferencing integration | Most overlooked use case; requires specific camera and codec compatibility |
Start by listing every type of content your organization plans to produce in the next 12–18 months. Then rank those by frequency and business impact. That ranking determines your minimum viable studio configuration.
Choose the right room (before you buy a single thing)
This section exists to save you from the single most expensive mistake in studio builds: starting with gear before fixing the space.
Acoustics
You cannot fix bad audio in post-production. Parallel hard walls create flutter echo. HVAC noise is the number-one production killer in corporate studios, and most teams don’t discover the problem until they’re already recording.
Practical acoustic treatment comes down to three actions: absorb reflections with panels on parallel walls, diffuse sound in corners, and isolate the room from HVAC and mechanical noise. These steps don’t require a professional acoustic engineer for most corporate spaces, but they do require planning before equipment arrives.
Power
Traditional studio lighting demands dedicated electrical circuits, which means an electrician, permits, and sometimes months of waiting. In leased office spaces, permanent electrical modifications may violate building agreements entirely.
Power over Ethernet (PoE) lighting eliminates this constraint by delivering power and control through a single network cable. If your building already has network infrastructure, you may not need to involve facilities, an electrician, or your landlord at all. For a deeper comparison, see our guide to PoE lighting as an alternative.
Ceiling height
The minimum ceiling height for a traditional 3-point lighting setup depends on your fixture type and mounting approach. Low-profile fixtures designed for drop ceilings (as low as 10 feet) have expanded what rooms are viable, but the constraint still needs to be verified before committing to a space.
Daylight control
Uncontrolled windows are a consistency killer. Natural light changes throughout the day, across seasons, and with weather. Every one of those changes affects skin tone rendering and white balance on camera. If the room has windows, plan for blackout treatment before anything else.
Room qualification checklist
Before committing to a room for your corporate video studio setup, verify every item on this list:
- Room is acoustically isolated from HVAC, corridors, and mechanical spaces
- Ceiling height is adequate for your lighting approach (verify with your lighting supplier)
- Dedicated power circuits are available, OR PoE infrastructure is possible
- No uncontrolled natural light sources (or blackout treatment planned)
- Room dimensions support your intended camera-to-subject distance
- Flooring does not create visible reflections in frame
- Internet/network connectivity is available for streaming and IP-based control
Think in subsystems, not products
Most people feel overwhelmed by studio planning because they’re trying to solve seven problems at once. Separating the studio into distinct subsystems makes each decision manageable — and the decisions build on each other in a logical sequence.
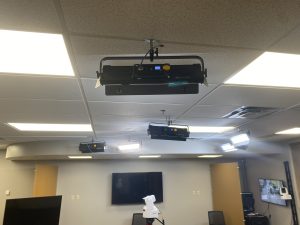
Lighting. The foundational layer. Key decisions: color temperature consistency, CRI quality (look for 95+ for accurate skin tones), and control method. Options include DMX (traditional wired control), PoE/IP (single-cable power and control), or manual. Your choice here directly affects power requirements and ceiling infrastructure.
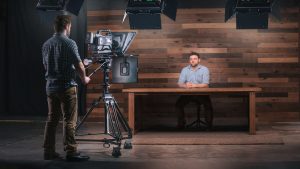
Cameras. Fixed cameras are simpler and cheaper. PTZ (pan-tilt-zoom) cameras add flexibility and can be repositioned remotely via presets, reducing the need for a dedicated camera operator. The protocol decision — SDI versus NDI — determines your cabling and routing architecture. For a technical breakdown, see our full NDI vs SDI comparison. (Article 13 in this series covers this topic in depth.)
Audio. Lavalier microphones work well for single presenters. Boundary microphones handle panel discussions. The critical decision is whether your audio chain includes a dedicated mixer or integrates directly into your switching platform. Monitoring — the ability to hear audio before and during production — is frequently skipped in corporate studios, and that shortcut causes problems on shoot day.
Switching, recording, and streaming. Hardware switchers offer reliability; software switchers offer flexibility and lower cost. Define your stream destinations (internal platform, YouTube, Teams/Zoom), your recording format, and your backup path for mission-critical broadcasts before selecting a switching platform.
Teleprompter and confidence monitoring. If presenters read from scripts, a teleprompter is not optional. PTZ-mounted teleprompters integrate with camera presets for multi-camera setups. Confidence monitors let presenters see their own framing and graphics during a live show — a small investment that dramatically improves on-camera performance.
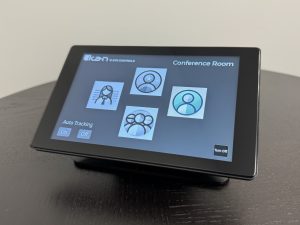
Control and automation. This subsystem determines how operators trigger scenes, presets, and show formats. A Q-SYS control layer can unify lighting, cameras, and audio under a single interface, reducing the operational complexity from “broadcast engineer required” to “trained show operator.” (Article 9 in this series covers one-button automation in detail.)
Network. IP-based studios need proper network architecture: IP addressing, sufficient bandwidth for video streams (especially with NDI), VLAN segmentation to separate production traffic from corporate traffic, and remote access for troubleshooting and support.
Get the subsystem architecture right and the specific products almost select themselves.
Three build tiers: starter, standard, and scale
Most planning guides fail here because they list gear instead of architecture. Each tier below describes what it solves, who it’s for, what you trade off, and what it enables next.
Starter
A single-person operation: one camera, basic 3-point lighting, a software switcher, and no automation. This tier is right for organizations producing primarily recorded, single-subject content — weekly executive updates or training videos shot one at a time.
The limitation is real: there’s no scalability without significant rework, and the operator is a single point of failure. If that person is unavailable, the studio sits idle.
Standard
A PTZ camera system with PoE or DMX lighting, scene presets, a teleprompter, and a light automation layer. This is the configuration that works for the majority of corporate environments, because it allows non-technical operators to run the studio consistently by recalling preset configurations rather than manually adjusting every parameter for each session.
The tradeoff is network design complexity. IP-based lighting and cameras require proper network architecture, and getting that wrong introduces reliability problems that are difficult to diagnose.
Scale
Multi-camera, full control-system automation (Q-SYS or equivalent), multi-room or campus-wide deployment. This tier is for organizations that need repeatable output at scale: multiple show formats, cross-site consistency, or simultaneous production across locations.
The risk at this tier is integration scoping. Getting the control system architecture wrong is expensive, and the planning phase matters more than the equipment selection.
| Dimension | Starter | Standard | Scale |
|---|---|---|---|
| Camera setup | 1 fixed or PTZ | 1–2 PTZ with presets | 2–3 PTZ + robotic/auto-framing |
| Lighting | Manual 3-point | PoE or DMX with scene presets | Full IP lighting with automation |
| Control model | Manual | Semi-automated (scene presets) | One-button / fully automated |
| Operator skill required | Moderate | Low | Minimal |
| Best for | Single-subject recorded content | Regular corporate broadcasting | Multi-show formats, campus scale |
| Biggest risk | Operator dependency | Network design complexity | Integration scoping |
| Path to next tier | Add automation layer | Add cameras + control system | Campus deployment strategy |
Staffing and workflow: running it without dedicated broadcast staff
The gap between “we want a studio” and “we can actually use it regularly” almost always comes down to staffing. Corporate environments want broadcast-quality output, but they don’t want to hire dedicated broadcast engineers to run the room.
The distinction matters: a show operator follows pre-set workflows and executes a defined sequence. A broadcast engineer designs systems, troubleshoots signal chains, and builds workflows from scratch. Most corporate studios need the former, not the latter.
Automation is what bridges that gap. When lighting, camera presets, audio routing, and switching are bundled into recallable scenes, the operator’s job simplifies from “manage 15 separate parameters” to “select the right show template and go.” For a walkthrough of what this looks like in practice, see our guide on setting up your first automated workflow.
A realistic day-one operator checklist looks like this: power on the system, select the appropriate show preset, verify the teleprompter script is loaded, confirm the stream destination, check audio levels on the monitoring output, and run the show. With a properly automated studio, that entire sequence takes minutes rather than the 60-90 minutes typical of a manual setup.
Training time depends on the automation layer. A fully preset-based studio can have a new operator producing content within days of hands-on training. A manual studio may require weeks. (Article 9 covers how automation makes it manageable for non-technical teams.)
Common failure points (and how to avoid them)
These are the problems that surface after the studio is built, and each one is expensive to fix retroactively. If you’ve been through a bad studio build, you’ll recognize these immediately.
Mixed color temperatures. Daylight through windows plus warm-toned artificial light creates a color mismatch that cannot be fully corrected in post without degrading the image. Every light source in the room needs to match, and uncontrolled natural light must be eliminated at the room level.
Reflections on monitors and glass surfaces. Teleprompter glass, confidence monitors, and windows all create visible reflections if not addressed during room design. These artifacts appear on camera and distract viewers. The fix is positioning and angle adjustment during the design phase, not after equipment is bolted down.
HVAC noise. The most underestimated audio problem in corporate video studios. Air handlers, duct rumble, and fan noise all register on sensitive microphones. No post-production filter fully compensates for a noisy room. Solving this requires duct silencers, vibration isolation, or relocating the studio away from mechanical equipment — all decisions that have to happen before the build, not after.
Inconsistent framing between sessions. When camera positions are set manually, framing varies from session to session. That variation undermines brand consistency and makes content look unprofessional over time. PTZ camera presets solve this: the same framing, every time, regardless of who operates the system.
Uncontrolled ambient light. Even small changes in natural light affect skin tone rendering on camera. A presenter who looks great at 10am may look washed out at 2pm if the room isn’t properly controlled. Blackout treatment and consistent artificial lighting are the only reliable solutions.
When to bring in a system integrator (and what to demand from one)
For straightforward starter-tier builds, a capable internal AV team may handle the project. For standard and scale-tier studios, a system integrator (SI) brings value that’s difficult to replicate internally.
What an SI delivers — in business terms
Time to deployment. An experienced SI has built studios before. They know the failure modes, the lead times, and the sequencing that prevents costly rework. A first-time internal build takes longer than expected almost every time.
Risk reduction. Getting the subsystem architecture right on the first pass avoids rework costs that can exceed the original budget. An SI who specializes in broadcast-AV convergence projects brings that architectural expertise.
Ongoing support. Who do you call at 8:45am when the CEO’s broadcast starts at 9:00 and the switcher isn’t responding? A good SI provides a documented support and escalation path that internal teams rarely build for themselves.
Vendor management. A single studio project involves products from many manufacturers. Coordinating procurement, compatibility, and delivery timelines across those vendors is a project management function that experienced SIs handle routinely.
What to demand from your SI
Before signing any contract, ask for these five things:
- A clear subsystem map before any product specification begins
- Reference clients in your industry or use-case type
- A commissioning plan — not just an installation plan — that includes testing every workflow end-to-end before handoff
- A documented support and escalation path post-launch
- Operator training included in the project scope, not as a separate add-on
Manufacturers like Ikan support SIs with integration documentation, certified control-system plugins, training programs, and pre-configured solution architectures that reduce design burden and project risk for both the integrator and the end client.
Ready to start planning? Talk to a product specialist — schedule a free studio planning consult.
Studio planning checklist: plan through operation
| Phase | Key decisions and actions |
|---|---|
| Plan | Define use cases and rank by frequency. Identify primary content types. Set budget parameters. Assign an internal champion. |
| Design | Select room and complete qualification checklist. Map all seven subsystems. Choose build tier. Engage an SI if the build is standard or scale tier. |
| Build | Procure equipment. Install network infrastructure. Mount lighting and cameras. Configure control system and presets. |
| Commission | Test every workflow end-to-end. Verify audio, lighting, and camera presets. Confirm stream and record paths. Document all system settings and IP addresses. |
| Operate | Train operators on show templates. Establish a content production schedule. Create a maintenance calendar. Plan for growth and system expansion. |
Frequently asked questions
How much space do I need for a corporate video studio?
A functional single-presenter studio can work in a room as small as 12×14 feet. Panel discussions and multi-camera setups need more depth — plan for at least 16×20 feet for three cameras with adequate subject-to-camera distance. Minimum ceiling height of 10 feet accommodates low-profile lighting fixtures.
What matters more: camera quality or lighting?
Lighting. A mid-range camera with proper lighting will produce better content than a high-end camera in a poorly lit room. Lighting affects skin tones, depth, and overall production quality more directly than resolution or sensor size. Prioritize your lighting subsystem first.
Do I need SDI or can I use NDI?
For most corporate studios, NDI is the more practical choice — it runs over standard network cabling and integrates easily with IP-based control systems. SDI remains the standard in traditional broadcast environments where absolute zero-latency and legacy equipment compatibility are critical. (See our full NDI vs SDI comparison — Article 13 in this series.)
Can non-technical staff run a corporate video studio?
Yes, with the right automation layer. When lighting scenes, camera presets, and audio routing are bundled into recallable show templates, the operator role shifts from technical expertise to workflow execution. (See Article 9 on how automation makes it manageable for non-technical teams.)
Do I need a teleprompter for internal communications?
If your presenters read from scripts, yes. A teleprompter improves delivery consistency, reduces the number of takes per session, and ensures messaging accuracy. For executive communications where precise wording matters, teleprompters pay for themselves quickly in saved production time.
How long does it take to build a corporate video studio?
A starter-tier setup in an already-suitable room can be operational in days. Standard-tier builds typically take several weeks, including network configuration, equipment procurement, and commissioning. Scale-tier multi-room deployments can span months depending on organizational procurement processes and site readiness across locations.
Key takeaways
- Define use cases before selecting equipment. The content strategy drives the studio architecture, not the other way around.
- Fix the room first. Acoustics, power, ceiling height, and daylight control impose hard limits that no equipment can overcome.
- Think in subsystems. Separating the studio into lighting, cameras, audio, switching, teleprompter, control, and network makes each decision manageable and sequential.
- Build for the next tier. Choose an architecture that can grow rather than equipment that only works for today’s workflow.
- Automation reduces the staffing barrier. Non-technical operators can run a preset-based studio with days of training, not weeks of broadcast education.
- Know the common failure points. Mixed color temperatures, HVAC noise, inconsistent framing, and uncontrolled ambient light are cheaper to prevent than to fix after the build.
- Bring in an SI for standard and scale builds. Architectural expertise and vendor management reduce time-to-deployment and rework risk.
Plan your studio with confidence. Schedule a free studio planning consult with a product specialist who can walk through subsystem selection, build-tier recommendations, and integration support tailored to your organization.